I seem to have gotten into a rut of continuously sewing small bags for gift-giving lately. My first post on these lined bags was my own Flat Bottomed Make-Up Bag, then I made a Zippered Bow Clutch with a Wrist Strap for my cousin's baby. Now I've made 2 of these dinosaur bags for 2 more babies that have been born recently. Babies, babies, babies! :)
Though these bags may be similar, each one is a little different, too. If one doesn't suit your needs, maybe one of the others will. Check them out!
Like I've said before, I'm not very good at measuring and sewing perfectly, but I will explain the process step by step as best I can. I'm not a professional, and I'm okay with my items looking "homemade", so hopefully you are too. :)
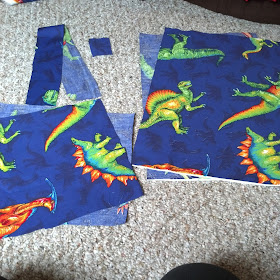
What you'll need:
2 large rectangles
2 long strips of fabric (a little longer than the rectangles)
4 squares (only 2 are pictured below)
1 long strip (for the wrist strap)
small piece of material for the loop
zipper
key ring
Taking 2 of the squares, place them wrong sides together, fold the edges inside, on only one end. Making sure they are flush together, sew along the edge. (Can do a single line, or double like I did.)
Now take the other 2 squares.
Place them wrong sides together, then cut evenly across where you want the zipper to be placed.
Sew the zipper in. (If you need some help doing this, see this post for some instructions.)
Fold the top edges in and sew just like you did with the last 2 squares. I only sewed one line this time.
Now arrange the zippered squares on top of the other two and sew across the top.
(Now it will look like it was double stitched.)
This is what it should look like right now.
If you're adding velcro, place it where you would like it and sew in place. Be sure to only sew through one layer of the fabric!!
Take your small piece of fabric for the loop and stitch it on each side.
Fold it in half and place it flush against the edge (raw edges to the outside).
Now set your squares aside and pick up your rectangles.
Sew the other side of the velcro strip across the top of one rectangle.
Place the rectangles wrong sides together. Fold the top edges inside, align, and sew.
Now take your long strips that are a little longer than the rectangles.
Fold the tops down and sew, then place along the edge of the rectangle. Sew in place.
Fold it around the raw edge and sew again.
It will look like this when done.
Now lay out the rectangle piece, velcro down.
Place the zippered piece, zipper down, over the top.
(Make sure the top is long enough that the velcro will match up with each other once it's sewn.)
Pin in place and sew the squares.
Don't worry, I evened up the bottom. :)
Trim off the excess and zigzag stitch down the sides and bottom.
When you turn the bag right side out, the edges of the top flap will be turned inward.
Hold it in place like that and stitch it down the sides.
Now turn it inside out, pinch the bottom corners, then sew straight across.
Cut off the tip and zigzag stitch.
Do this to both corners.
Remember that long strip of fabric we had for the wrist strap?
Sew it to the width you'd like, place a key ring in it and sew the ends together.
Turn it right side out. Sew the very end.
Move the key ring to that end, then sew along the other side of it.
Turn it right side out and attach the wrist strap to the loop with the key ring.
I messed up a little with my velcro on the second bag, so I took some scrap fabric, shaped it in the baby's first initial, then sewed it in place.


No comments:
Post a Comment