Search This Blog

Friday, July 11, 2014

Perfectly Grilled Sweet Corn


I found out this past weekend that I take grilled sweet corn for granted. It just ends up on your plate and you enjoy the fruits of someone else figuring out how to make it "just right".

Grilled sweet corn is so simple... or so I thought.  After 6 of us standing in the kitchen, going back and forth deciding if Bobby Flay or AllRecipes.com would be better, we decided what we would do. 

I am not so much sharing this with you because it's so hard to do (you probably know how to grill corn), I am doing this so that I remember the next time. :)  I don't want to waste time discussing when I could be enjoying this yummy summer treat. 


Here it goes:

1. The first thing I did was clean out the silk.  Carefully pull the husk back.  
After removing all the silk, replace the husks. 


2. Soak in salt water for an hour. After about 45 minutes of soaking, start the grill. 

3. Open and spray (or brush) olive oil on the corn. 

4. Sprinkle with the seasonings of your choice. Good ol' salt and pepper for me.
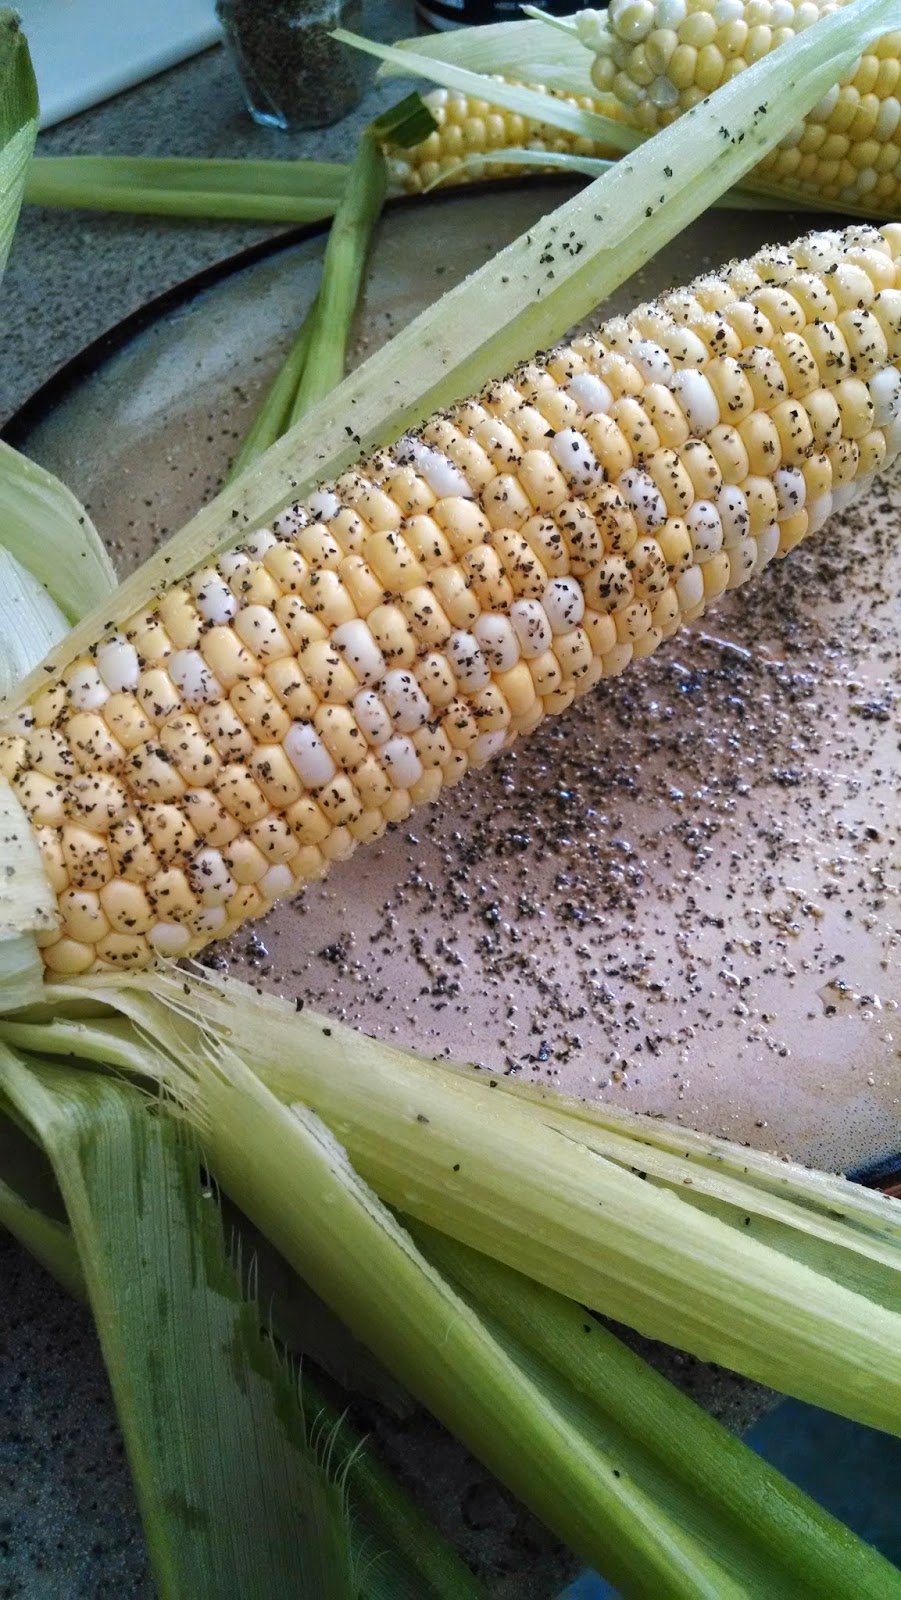

5.  Replace the husks again, and tie the corn shut using a small strand of husk. (You could also use kitchen twine if that's really not working for ya.)


6.  Put aluminum foil on the grill. (FYI...we started a fire because we didn't do that at first) :)


8. Cook for approximately 45 minutes, turning frequently.


                                                                            AMAZING!


Thursday, July 3, 2014

"Daily Planner" Printable

I don't know about you...but I am a 'list' person!  My kids can tell you stories about their mom, and her obsession with her "Daily Planner." I am just about sure it will put a smile on each of their faces when they think of this. :)

I realize there are organizational apps available on smartphones and computers, but I still prefer a nice pen and paper!  I have made many planner pages throughout the years. I have changed them time and time again, but I have found that this page has worked best for me. 

 Being a homeschool mom and the secretary for our parish (I have a separate planner page made especially for when I go to the office!), I need to organize my time as best as I can.  I need all the help I can get, and this page gives me a sense of accomplishment. Especially, when I can check off the boxes! :-)


I wanted to share this with you and I hope you can use it to help organize your life! 

Take Care and God Bless your Day!


Monday, June 30, 2014

Peanut Butter Bars

My brother's graduation party was last month, so I went to my parent's house beforehand to make the bars for my Mom. She was pretty busy getting everything else ready, I figured I could help her out with the baking. Among other types of bars, I made these peanut butter bars that were a big hit with the family!
My little sister, Clara, told me they were her "FAVORITE!" :)


Ingredients

BASE:
1 c. butter, melted
2 c. graham cracker crumbs, finely ground
2-3 c. powdered sugar
1 c. creamy peanut butter

TOPPING:
1/4 c. creamy peanut butter
1 1/2 c. chocolate chips


Directions

In a large mixing bowl, combine the melted butter, graham cracker crumbs, peanut butter and 2 cups of the powdered sugar. Stir until well combined. (Mixture should be thick and moldable. If it's too runny, add more powdered sugar until you achieve desired consistency.)
Press into an ungreased 9x13 inch pan.
In a glass bowl, melt the chocolate chips and additional peanut butter in the microwave in intervals until smooth and creamy.
Spread evenly over the top of the graham cracker mixture.
Place in the refrigerator for at least an hour or until fully chilled before cutting into bars.


***************************************************************

(Directions with Photos)

In a large mixing bowl, combine the melted butter, graham cracker crumbs, peanut butter and 2 cups of the powdered sugar. 


Stir until well combined.


Mixture should be thick and moldable. If it's too runny (like shown above), add more powdered sugar until you achieve desired consistency (shown below).

Press into an ungreased 9x13 inch pan.


In a glass bowl, combine the chocolate chips and additional peanut butter.


Place in the microwave for 45 seconds, stir, then continue in 15 second intervals.


Continue melting until smooth and creamy.


Pour over graham cracker mixture.


Spread evenly.


Place in the refrigerator for at least an hour or until fully chilled before cutting into bars.


Scrumptious! :)


Friday, June 27, 2014

Veggie Pasta Salad


I can only say how many times that my husband and I are trying to watch what we eat!  For fear of really boring you, I will steer away from that line of thought today. :)

Instead, I will say that we have been focusing on quick meals.  This meal is definitely that... especially if you have another "chopper" in the kitchen. :)  My husband and I agreed that it is a really nice, light tasting pasta, but it needs a "little something". Because we were both really hungry, we didn't bother trying to figure it out.  Let me know what you would do to give it a little "mmmff".  

So for a quick (and healthy ;) meal, give it a try.  Don't forget to comment on how to make it better.  I love suggestions!!! :)


VEGGIE PASTA SALAD

1/4 cup white wine vinegar
2 T. extra virgin olive oil
16 ounces of whole wheat fusilli, cooked
1 tsp. dried basil
1 tsp. dried oregano
3 kosher pickles, chopped
1 red pepper, chopped
1 green pepper, chopped
1 yellow pepper, chopped
3 stalks celery, chopped
1/2 cup grated carrots
2 T. dijon mustard


DIRECTIONS

1.  In a bowl, whisk white wine vinegar and oil.  Set aside.
2. In a large bowl, add fusilli, vinegar and oil mixure, and dried spices.  Mix with a large spatula.
3. Add chopped veggies. 
4. Add 2 T. mustard.  Mix well.  Chill and serve!

EASY!!!


Wednesday, June 25, 2014

DeLite Pizza

Life is busy. Whether it is work, school, homeschooling, cleaning, sports, church, activities.....as we all know, I could go on and on. :) To add to all our busyness right now, we are in the process of buying a house and hope to be moving in the next couple weeks. (Yay!) As I was grocery shopping, I was trying to buy food items that would make my life a little easier without resorting to the processed food in a box. Ew.
So I ended up throwing this pizza together.  Oh. My. Yum.
I loved it.  My kids loved it.  It doesn't get more satisfying than that. 
As I said, I was trying to turn this into a quick meal so I used some shortcuts.  If you have the time, by all means...Take the long route.  It will be worth it in the end and probably be even tastier.  :)

If you need a recipe for your own pizza crust, these two are great!


So yummy!

Ingredients:

Pre-baked Wheat Pizza Crust
3 Tablespoons butter
2-3 teaspoons minced garlic
12.5 oz can chicken breast
salt and pepper
sliced baby portabella mushrooms
small onion, chopped
medium tomato, sliced
2 cups fresh spinach
6-8 ounce mozzarella cheese, shredded
Parmesan cheese (see below)

I saved lots of time using a pre-baked crust. Obviously, if you make your own, it will be even better. 
I also used pre-minced garlic.
Next, I used canned chicken. Feel free to cook up your own chicken breast and use that instead.
One thing I don't usually compromise on is shredded cheese. I prefer just shredding a block of mozzarella rather than using a bag of shredded cheese that always has that sawdust coating on it. It melts better and just plain tastes better, too!
And now for the parmesan cheese.....


....Mama Francesca's Fiero Parmesan and Red Pepper. It is awesome!
I found it at Walmart. If you prefer, you could easily substitute with freshly shredded parmesan and just add crushed red pepper, basil, oregano, and parsley. But for now, I will continue to use this.
Now, onto the directions....


Pre-heat the oven to 425 degrees.
Saute the garlic in the butter in a
 medium sauce pan on medium heat.


When the garlic is golden brown 
add the can of chicken.
Salt and pepper to taste.


Now add a generous sprinkling of parmesan cheese. Mix well.


Top the pizza crust with the garlic chicken mixture. Add desired amount
 of sliced mushrooms.


Add chopped onions and the tomato slices.


Top it with fresh spinach.


Now add the shredded mozzarella cheese and another sprinkling of parmesan cheese.
Bake at 425 degrees for 15-20 minutes or until golden brown. 


Ta-Da!! 
And believe it or not, it tastes just as good as it looks! 
Ok...now I am hungry. :)


Monday, June 23, 2014

Banana Crumb Muffins


INGREDIENTS
1 1/2 c. Flour
1 tsp. Baking Soda
1 tsp. Baking Powder
1/2 tsp. Salt
3 Bananas, Mashed
3/4 c. White Sugar
1 egg, Lightly Beaten
1/3 c. Butter, Melted
1/3 c. Packed Brown Sugar
2 Tbsp. Flour
1/8 tsp. Ground Cinnamon 
1 Tbsp. Butter

Preheat oven to 375 degrees F. Lightly grease 12 muffin cups, or line with muffin papers.
In a large bowl, mix together 1 1/2 cups flour, baking soda, baking powder and salt.


In another bowl, beat together bananas, sugar, egg and melted butter.


Stir the banana mixture into the flour mixture just until moistened. Spoon batter into prepared muffin cups.


In a small bowl, mix together brown sugar, 2 tablespoons flour and cinnamon.
Cut in 1 tablespoon butter until mixture resembles coarse cornmeal.


Sprinkle topping over muffins.


Bake in preheated oven for 18 to 20 minutes, until a toothpick
inserted into center of a muffin comes out clean.


Hope you enjoy!!! :)

Wednesday, June 18, 2014

Frozen Spinach Cubes


I love smoothies! And being able to add loads of spinach in my fruit smoothies has been awesome. You can't taste the spinach, but you get all those lovely nutrients. :)

The only bad thing is that I usually don't use it all up before the spinach goes bad. Then, I had an idea. If I can freeze my fruit in ready-to-go baggies, then why can't the spinach get thrown in there, too? 

We tried putting the spinach leaves straight in, but the got really crisp and papery and were a bit of a mess. So, instead we tried blending them into frozen cubes. It worked awesome!

*************************************

Just gather up your spinach and make sure it's clean.
Place it in a blender with 1-2 Tablespoons of water.


Start blending.


Add more spinach periodically until you've blended as much as you want.


Pour into a clean ice cube tray.


Freeze for about 2 hours, or until fully frozen.


Pop out and place in a freezer bag on their own, or divide them up with fruit so you have everything ready to go!

I've been using frozen pineapple, banana, blueberries, and chia seeds with 2-3 spinach cubes. I blend it up with 1/2 c. Greek yogurt and some water....delicious! :)


Check these out!