Search This Blog

Wednesday, January 15, 2014

Homemade Hot Cocoa Mix

Homemade Hot Cocoa Mix


******************************************

Winter is here and what warms the 
heart more than hot cocoa?
 
****************************************
I don't know about you, but I have tried many hot cocoa recipes, and I finally combined a couple of them to suit my taste.

This is the one the kids raved about and said it was their favorite! So, I thought I would share this simple recipe.


Mix Together in large bowl:

5 1/3 Cups notfat dry milk
1/2 cup powdered sugar
1 cup granulated sugar
3 oz. dry coffee creamer (about 3/4 cup)
1 lb. instant chocolate drink mix (about 2 1/2 cup)
1/2 tsp. salt

I use a large whisk to stir the ingredients.  
It seems to work better then a spoon.

Boil your water, so you can be ready to enjoy!  

I use 1/3 cup (give or take) of mix for each serving.  
I store the dry mix in a Tupperware container.


 I made sure I had it on hand during Christmas season, 
thus the reason for the picture with the candy cane below. 


******************************************************

Any time of year is great for hot cocoa... 
******************************************************


******************************************************
 
and there is just something special about sitting down 
with an nice soothing cup of it!

 
******************************************************
anonionexposed.blogspot.com


Monday, January 13, 2014

French Toast

This morning we woke up to a beautiful winter morning...what better way to start the day than with a hot breakfast and a cup of hot cocoa?? :) 
Our choice??...french toast!! :)
I know french toast is a pretty basic recipe but there are several variations...and here is one that my sister, Sarah came up with.

8 slices of french bread, sliced about 3/4-1 inch thick
2 Tablespoons honey
1/2 cup heavy whipping cream
1/2 cup milk (I used whole milk)
3 eggs
1 tsp vanilla
2-3 Tablespoons butter
cinnamon
Toppings:
butter, syrup, berries, whip cream...


Yum, right?!


Step 1:  Warm 2 Tablespoons of honey in the microwave for 20 seconds.


Step 2:  Combine your warm honey along with the heavy whipping cream, milk, eggs, and a
generous sprinkling of cinnamon in a shallow dish. Whisk well. Heat a large skillet to medium heat and add 2 Tablespoons butter.


While the skillet is heating begin dipping your slices of bread in the egg mixture allowing them a few seconds on each side to soak up the liquid. 


Place in the hot skillet. 


Fry each side for a few minutes or until golden brown.
Remove from pan. You may need to add some additional butter for the next batch.


Top with your choice of toppings! :)
My favorite is butter, syrup, with a dollop of whip cream. YUMM-O!

Saturday, January 11, 2014

Cherry Pineapple Dump Cake

Cherry pineapple dump cake. It's exactly how it sounds, and it's amazing! You literally dump everything in the pan. No mixing or measuring, just "leveling" so it's quick and easy! 

While at work last week, Ray approached me with a sample of this cake. He had made it before he came to work, so it was still warm. (Ray works with me and is well known for his extensive knowledge of every little fact that you could possibly think of. Apparently, he knows how to bake, too!) He gave me permission to share this cake with you, and I'm oh so happy he did! 

I made it while my sisters were visiting last week, and we devoured it! We had some while it was still warm, and had the leftovers after church the next day. (Yes, we ate "cake" for breakfast, and we didn't care. It was SO good!) Honestly, I think I liked it better the next day after it had been in the refrigerator overnight. So, depending on what works best for your schedule, you can know that it's good warm or cold. :) And, of course, a little whipped cream never hurts, either!


Ingredients

20 oz. crushed pineapple
20 oz. cherry pie filling
1 yellow cake mix
pecans, optional
1/2 c. butter, divided

Directions

Preheat your oven to 350 degrees.
Pour the crushed pineapple (juice and all!) in a 9x13 inch pan and spread it out evenly.
Repeat with the cherry pie filling.
Sprinkle the cake mix over the fruit and spread it out.
Divide butter into little slabs and randomly toss them on top.
 If using pecans, sprinkle those over the top.
Bake for 45-60 minutes, or until golden brown.


(Directions with Photos)

Preheat your oven to 350 degrees.

Pour the crushed pineapple (juice and all!) in a 9x13 inch pan and spread it out evenly.


Repeat with the cherry pie filling.


Sprinkle the cake mix over the fruit and spread it out.


Divide butter into little slabs and randomly toss them on top.


If using pecans, sprinkle those over the top.
(We only put pecans on half of the cake, since not everybody here likes nuts.)


Bake for 45-60 minutes, or until golden brown.


YUM!!!!


If you don't like pineapple or cherries, feel free to switch it up! Here are a few that my husband and I thought of that we would like to try sometime. Pineapple & blueberry, peach & apple, peach & blackberry, peach & blueberry, pineapple & peach. If you find a combination that you like, please share! :)


Cheesy Jalapeno Dip

Being that the Superbowl is coming soon, I thought it would be nice to share something that you could serve for the big game. We actually brought this to a friend's house a couple weeks ago, and got lots of compliments. I used our food processor, and (although it was super easy!) the ingredients blended together a little too much for me. I loved the dip, but next time I think I'm just going to dice everything by hand. :)


Ingredients

Dip:
6 slices bacon, cooked and crumbled
6 jalapenos, diced
1/4 c. red onion, diced
2 pkgs. (16 oz.) cream cheese, softened
3/4 c. mayonnaise
3/4 c. cheddar cheese, shredded
3/4 c. mozzarella cheese, shredded

Topping:
1 c. crushed Ritz crackers
1/2 c. Parmesan cheese, finely grated
1/4 c. butter, melted

Directions

Preheat oven to 350 degrees.
Combine bacon, jalapenos, and red onion.
In a separate bowl, mix cream cheese, mayonnaise, cheddar cheese, and mozzarella cheese until well mixed. 
Add to bacon mixture and stir well.
Spread evenly into an oven-safe dish.
In a small bowl, mix cracker crumbs, Parmesan cheese, and the melted butter.
Sprinkle it evenly over the top of the prepared dip.
Bake for about 30 minutes or until golden brown and bubbly.
Serve while still hot.


(Directions with Photos)

Preheat oven to 350 degrees.
Combine bacon, jalapenos, and red onion in a medium bowl.

*Like I said earlier, you could use your food processor like shown here, but I would suggest dicing the ingredients by hand. :)


In a separate bowl, mix cream cheese, mayonnaise, cheddar cheese, and mozzarella cheese until well mixed. 
Add to bacon mixture and stir well.


Spread evenly into an oven-safe dish.

(I used a circular casserole dish. You could use an 8x8 inch or 9x13 inch pan, as well, depending on how thick you want your dip to be.)


In a small bowl, mix cracker crumbs, Parmesan cheese, and the melted butter.


Sprinkle it evenly over the top of the dip.


Bake for about 30 minutes or until golden brown and bubbly.


Serve with your favorite crackers or tortilla chips while still hot.


Friday, January 10, 2014

Pumpkin Roll


Walking into Kroger, my husband and I saw a table full of goodies--soon to be "expired" holiday ingredients.  I don't know how everyone else feels, but I think whoever had the idea to put this stuff right at the front door is genius.  Prior to seeing that table, our list consisted of about 3 things.  Walking out, we had MANY more items in our grocery bags.  In those bags, Libby's Pure Pumpkin ended up being one of the added items.  The BIG can for $0.99!  Heck yes!!
Now aside from making my usual pumpkin pie during the holidays, I have never experimented with pumpkin.  I don't know why.  I love it.  Well, this past Thanksgiving, my sister in law's boyfriend brought a delicious pumpkin roll that his sister had made for him to share.  Remembering that, I decided to venture from the comfort zone of my normal pumpkin pie and give this new (for me) dessert a try.
Although I have never made a jelly roll of any kind, which is why I do not have a jelly roll pan, I made the best of it.  Using a half sheet, which is a little bigger than a jelly roll pan, I crossed my fingers.  Worst case scenario, it's a large flop.  Mediocre scenario, the roll falls apart but I learned the recipe was good. (...and I would know a jelly roll pan would be in my future. ;) Best case scenario, it all works great!

Well folks...it worked great.  You should definitely try this recipe.  I found it when I looked up Libby's Pumpkin Roll.  I am not advertising, but I would like to note, in my opinion, Libby's 100% Pure Pumpkin is the best pumpkin to use. :)


Preparation:
  • Preheat the oven to 375 degrees.  Grease 15 x 10 jelly roll pan; line with wax paper.  Grease and flour paper.
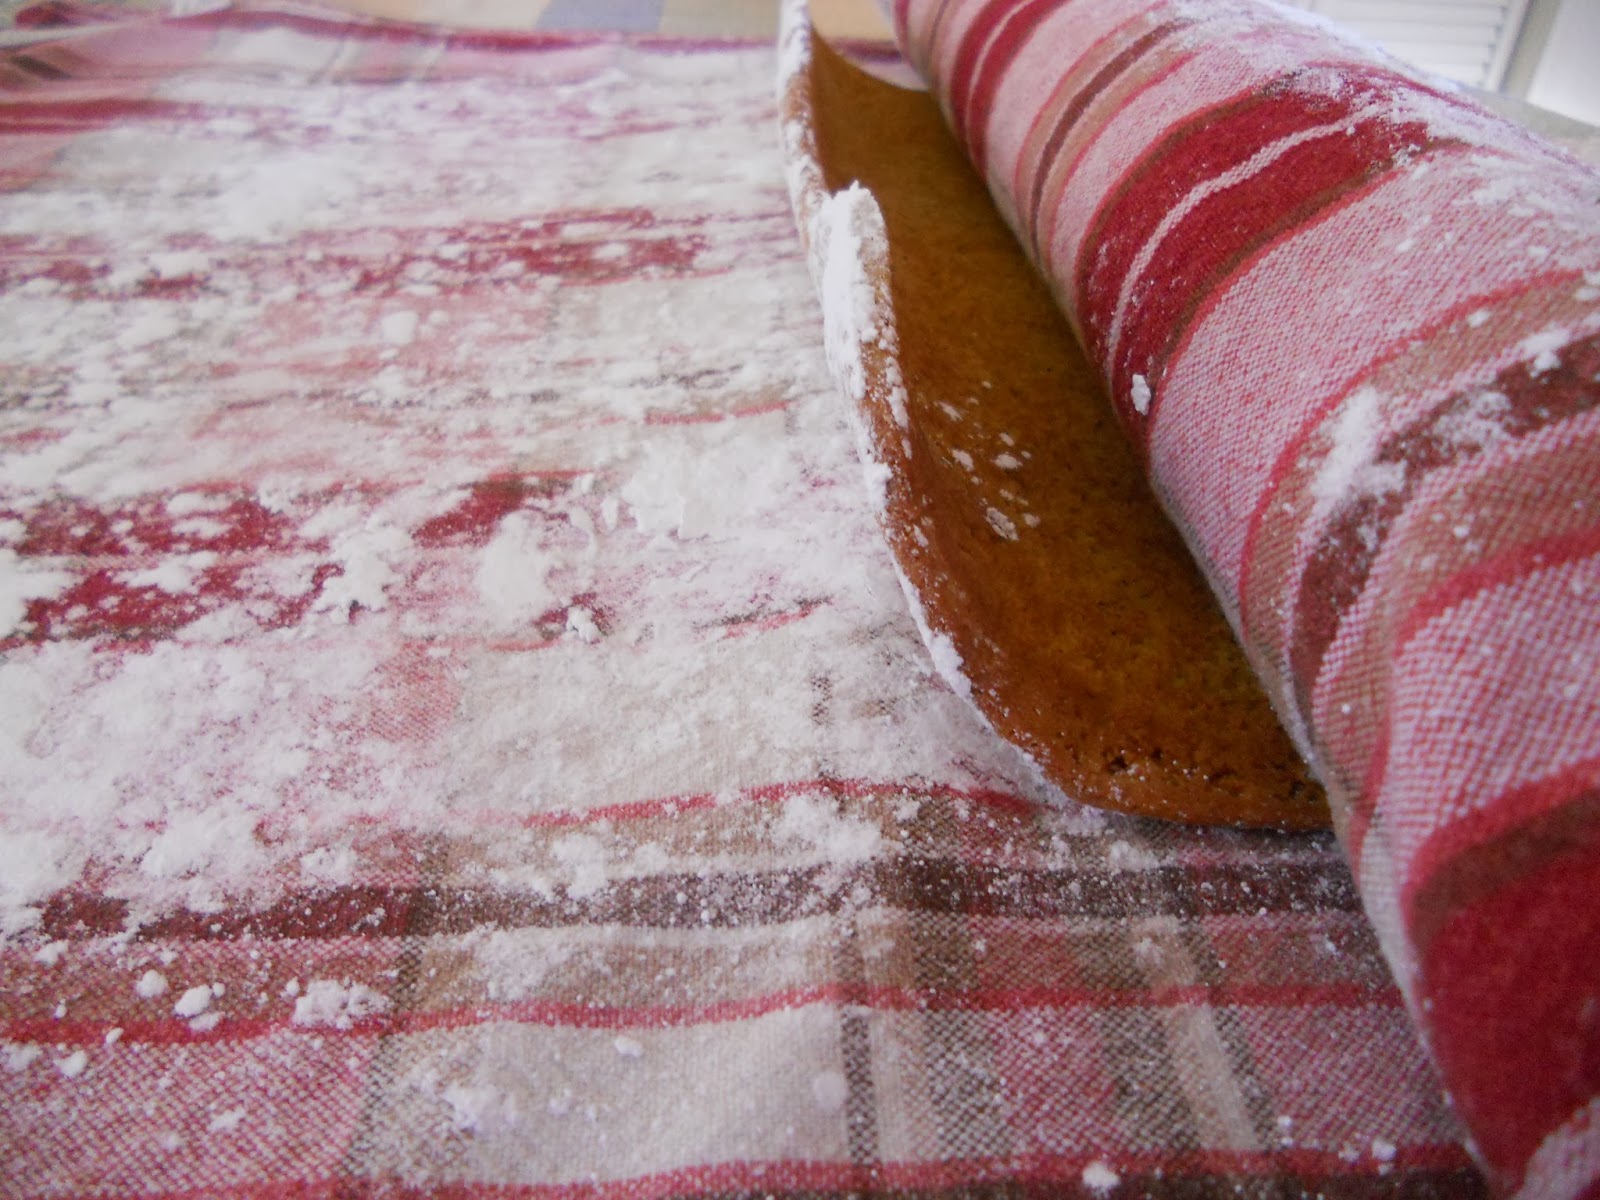
  • Sprinkle a thin, cotton kitchen towel with powdered sugar, making sure to use enough powdered sugar so your cake won't stick.
  • Set a cooling rack to the side.  
Cake:

1/4 cup powdered sugar (to sprinkle on towel)
3/4 cup all-purpose flour
1/2 teaspoon baking powder
1/2 teaspoon baking soda
1/2 teaspoon cinnamon
1/2 teaspoon ground cloves
1/4 teaspoon salt
3 large eggs
1 cup granulated sugar
2/3 cup Libby's 100% Pure Pumpkin (the only kind to use!!)
1 cup walnuts, chopped (optional)

Filling:

1- 8 oz. package of cream cheese
1 cup powdered sugar
6 Tablespoons soft butter
 1 teaspoon pure vanilla


Directions:
  • Combine dry ingredients-flour, baking powder, baking soda, cinnamon, cloves, and salt- in a small bowl.  
  • In a large bowl, beat eggs and granulated sugar until thick. 
  • Beat in pumpkin.
  • STIR in flour mixture. 


  • Spread evenly in pan. (As I stated above, I did not have a jelly roll pan.  Using a half sheet, which is a little larger than a jelly roll pan, I spread the batter almost to the edges.  It worked great as an improvisation. )

  • Bake 13 to 15 minutes or when cake "bounces" back when touched. 


  • When finished baking turn pan over on powdered sugar towel immediately. 
Excuse my pan!  I guess I should use one of our posts on how to clean your cookie sheets.  To see how to clean your pans, click HERE!


  • Carefully remove hot pan. 


  • Slowly peel off the wax paper. 


  • Starting at the narrow end, carefully start rolling. 


  • Roll....roll....roll.....


  • Roll until you reach the end of the towel. 


  • Place on a cooling rack and allow to sit for approximately an hour or until cool. 


  • As your roll cools, get ingredients around for your filling.


  • When the hour is almost up, combine filling ingredients and blend until smooth. 


  • After your roll has completely cooled, carefully unroll. 


  • Spread filling evenly on your cake.


  • Once again, carefully roll to the end.


  • Cover with plastic and refrigerate at least 1 hour.  I did not have plastic wrap so I used wax paper and aluminum foil.  I was all about improvising today. :)


Using dental floss, I carefully cut my roll.  If you don't know how to do this, it's easy.  Using a long piece of floss, slide the middle of the floss under the roll.  Bring the floss over the top and cross sides.  Pull evenly and you will cut pretty pieces every time. 

ENJOY!

Wednesday, January 8, 2014

Chicken Bacon Ranch Ring


Chicken. Bacon. Ranch....some of my favorite foods!! :)
 As a busy homeschooling mom, I am always on the look-out for quick lunch ideas. 
This may not be my fastest lunch "go-to" but it definitely is a good one! :)

Ingredients:

4 cups chicken breast, fully cooked and diced
2 packages refrigerated large crescent rolls
1/2 cup real bacon pieces (or 6 slices bacon, cooked and crumbled)
1/4 cup sour cream
1/4 cup mayo 
1 Tbsp. Ranch dip mix (I use a fabulous homemade recipe posted by my sister, Renae. For this recipe CLICK HERE.)
1 1/4 cups mozzarella cheese, shredded
2 tsp dijon mustard
1-2 roma tomatoes
salt and pepper

Serves: 8

Preheat your oven to 375 degrees. 
Place your cooked and diced chicken in a large bowl. Salt and pepper to taste. 


In a medium bowl, combine the mayo, sour cream, ranch seasoning, bacon pieces, mustard, and 1 cup of the mozzarella cheese.  Mix well.  Add to the chicken and stir until thoroughly combined.


Next open the packages of crescent rolls. This recipe works best if you use the LARGE rolls rather than the original size. Arrange them in a star-like pattern on a large round stone. Perfectionism is not necessary. It always looks good and tastes yummy in the end. :)


Using a small roller, roll the wide ends until they are all pressed together. That is the best way I know how to describe it. ;)


Next, using a large scoop, arrange your chicken around the "ring". 


Thinly slice the roma tomatoes and arrange on top of the chicken mixture.


Now simply bring the pointed ends of the rolls over the chicken and securely tuck the edges underneath on the inner part of the ring.  That sounds way more confusing than it actually is. Thank goodness for pictures, right?? :)


When you are all done tucking, it should resemble something like this. Now place your ring in your preheated oven (375 degrees). Bake for 30 minutes or until golden brown. Sprinkle the remaining 1/4 cup cheese on top of the ring when there is approximately 5 minutes left of baking time. 


Not too shabby for a quick lunch, right?? :)
And for the extreme ranch lovers: A drizzle of ranch salad dressing on top is completely acceptable! :)


Check these out!