Search This Blog

Monday, September 8, 2014

Bridal Shower Game Ideas

Hosting a bridal shower is a pretty big endeavor! I've always known that there was a lot to do, and it was probably pretty stressful, but I've never had to do more than bring a dish to share.
This time around, however, my sister asked me to be the matron of honor. Therefore, the "planning and directing" of the shower fell upon my shoulders. Invitations, menus, games, prizes, and decorations...it can get to be a bit of an overload. Luckily, my sister's bridal attendants have been a great team, working together to make Laura's pre-wedding festivities wonderful memories for her!

Last Saturday was her bridal shower. We decided to host Luke and Laura's families at the same time and do one big shower for her. We ended up hosting over 75 people at this shower!

Since it was quite a job planning everything, I decided to make a post about what we did for 2 reasons.

1. It may help one of our readers out to see a base plan and work from there, rather than starting from scratch.
2. To make it easier for me to remember what to do in case I ever get do it again. Selfish, I know. :)


First of all, Laura has a bit of a rustic theme for their wedding.
Because of this, we had very minimal decorations.

No balloon, streamers, or confetti all over the tables.
Instead, we set up a "greeting table" near the entrance. On it, we set up stations for different things. For each item we placed there, we had a chalkboard explaining what to do.


GREETING TABLE

"ADDRESS YOUR OWN THANK YOU"
blank envelopes
pens

"DATE IDEAS"
2 mini aluminum pails 
(one for blank sticks & one for the sticks that are filled out)
large craft sticks
fine tip permanent markers

"PICTURES OF THE COUPLE"
small album of their engagement photos

"INSTAGRAM"
a chalkboard explaining how you could Instagram photos of the shower to an online album for the couple

***************************************************************

We also had a chalkboard placed at the beginning of the buffet line listing the MENU, and mini chalkboards near some of the dishes.

MENU

Chicken Salad on Croissants
"Wedding Salad" (a cottage cheese & jello salad...delicious!)
Broccoli Raisin Salad
Caesar Salad (w/Parmesan, cherry tomatoes, and croutons on the side)
Fresh fruit tray w/dips
Fresh vegetable tray w/dip
Cheese & Crackers

Cupcakes

Lemonade
Caribou Coffee

**********************************************************

Next is the fun part. The games!
Every shower I have been to, you receive a small gift every time you win a game. We didn't know how many people to expect and wanted to make sure we had enough prizes (since you can get a lot of winners at times!), but we also wanted to do something a little different than "the norm".

We decided to play the games that we wanted, but instead of handing out a prize each time someone won, we had them enter their name into a bucket. (Of course, it was one of those mini aluminum pails to match the theme!) At the end of all the games, we had the bride pick names from the pail and they went and picked a "prize basket". She just continued drawing names until the baskets were gone.


Here are the games we chose:


PASS THE PRESENTS
(This is the only game that we had 4 "winners" for. We chose packages of fun-size candy bars. We got Snickers, Kit-Kats, Twix, and Almond Joy and wrapped them up.)

We had everyone sit in a circle, which ended up being a pretty big circle!
We randomly handed out the 4 wrapped prizes.
We then read a story and every time they heard the word "RIGHT", they had to pass the present to the right, and if they heard "LEFT", they would pass it to the left. The guests holding the presents at the end of the story got to keep the prizes! 
(Obviously, you'll want to edit the story to fit the couple you're using it for.)

"Luke and Laura met many years ago.
Laura didn't know Luke was Mr. RIGHT RIGHT away.
He LEFT for the Navy almost RIGHT after they met.
RIGHT after he returned home, Luke saw Laura at church almost RIGHT where he LEFT her.
It had been more than 4 years and now seemed the RIGHT time for Mr. RIGHT to ask her out.
Their first date LEFT them both giddy and excited.
Laura knew she had found her Mr. RIGHT.
Mr. RIGHT proposed almost RIGHT away and they LEFT to share the news!
RIGHT after their engagement, they decided to get married almost RIGHT away which LEFT them little time to make the RIGHT decisions and the RIGHT plans for their wedding.
They LEFT to meet the RIGHT people so they could help the couple make the RIGHT decisions.
They've LEFT messages, picked the RIGHT flowers, and Laura LEFT Mr. RIGHT to make some decisions, too.
Mr. RIGHT called Laura RIGHT back with the RIGHT answers from the questions she LEFT him.
Laura LEFT it up the Mr. RIGHT to pick the RIGHT best man.
With only 28 days until their wedding RIGHT now, there's little time LEFT to spare and so much LEFT to do!
But...even though RIGHT now the wedding is RIGHT around the corner, whatever is LEFT to do can be LEFT for tomorrow.
RIGHT now we are gonna have the RIGHT kind of fun with those of you that are LEFT."

**********************************

PAPER PLATE ART

Hand out a sturdy paper plate and pen to each guest. Instruct them to turn the plate upside-down and place it on their head. Without removing the plate, they had to follow these instructions...

1. Draw the bride. (Tell them it can be as simple or as detailed as they'd like.)
2. Now add the aisle for her to walk down.
3. Now, don't forget she needs a bouquet.
4. We can't forget to have her father by her side.
5. Now, put Luke at the end of the aisle waiting for her.
6. Don't forget that he needs a boutonniere.
7. Now, they are getting married in church, so they should have a cross above them.
8. Finally, she can't walk up without shoes, so be sure to give her some heels.

They can now remove the plate from the top of their head and look at their "picture". Now you read the point system so they can add up their points.

If the shoes are touching the aisle: 1 point
If the bouquet is in her hands: 2 points
If her Father is touching her arm: 2 points
If you drew a veil on the bride: 3 points
Did you draw a tiara, too? If so: 3 points
If you gave the groom a smile on his face: 4 points
If his boutonniere is on his chest: 4 points
If the cross is above them: 4 points

The guests with the highest score got to put their name in the bucket!

**********************************

"HOW WELL DO YOU KNOW THE COUPLE?"

We passed out a piece of paper and pen and had them number them 1-22. We read the list of questions and had them write their answers. Afterwards, the bride reread the questions and gave them the answers. Anyone with 15 points or higher got to put their name in the bucket!

1 POINT QUESTIONS:
1. Where did Luke and Laura meet?
2. What is Laura's favorite dish?
3. Who takes longer to get ready?
4. Who keeps their car cleaner?
5. What color are Luke's eyes?
6. Laura thinks Luke's best feature is ___________?
7. Luke proposed at a childhood fishing spot. Was it his or Laura's?
8. Luke and Laura have the same favorite beverage. What is it?
9. What sport did Luke participate in when he was 14 & 15 years old?
10. Who makes better fried eggs?
11. One enjoys reading books more than the other. Which one is the bookworm?
12. Which one LOVES pickles?
13. What frozen treat do they eat, probably too often?
14. Who loves fried green tomatoes?
15. Where will they be living after the wedding?
16. What branch of the military did Luke serve in for 4 years?
17. Who's favorite TV show is "The Office"?
18. Who was the last one to visit a foreign country?
19. Who's favorite restaurant is Red Lobster?
20. What time is the wedding taking place?

2 POINT QUESTIONS:
21. What kind of cologne does Luke wear?
22. They both worked at grocery stores growing up. Can you name any of the stores? (There were 3 possible answers for this one, so they got 2 points for each correct answer.)

**********************************

TOILET PAPER BRIDES
(Each of the bridesmaids were instructed prior to the shower to bring toilet paper.)

 (The bride left the room for this one.)
We went around the room and numbered the guests 1 through 4. All the "1's" went to one corner of the room, the "2s" went to a different corner, etc. Each group was instructed to pick a "bride" from their group, they were given 6 rolls of toilet paper, and we set a timer for 10 minutes.

They created their "bride" and when the timer went off, each of the "brides" gathered to the center of the room. We brought the real bride back into the room to do the judging.

Everyone in the group that had the winning "bride" got to put their name in the bucket!

**********************************

At this point, all the games were done, so we brought out the bucket of names, mixed them up and had the bride pick out a name, one at a time. If their name was called, they got to pick one of the following baskets:


"RUSTIC HOME"
wooden cutting board
stars & stripes kitchen towel
pine-scented candle
raspberry-orange marmalade
basil pesto
small spreader
loaf of Artisan Bread 


"MOVIE CRITIC"
Nanny McPhee DVD
popcorn kernels
buffalo-ranch popcorn seasoning
nacho cheese popcorn seasoning
Mike'n'Ikes
Milk Duds


"COFFEE LOVERS"
'Caribou Coffee' coffee beans
set of mugs
hazelnut chocolate bar
orange & almond chocolate bar
French Vanilla coffee syrup


"CHEF'S CHOICE"
quilted trivet
mini "Dutch Oven"
measuring cups & spoons
basting brush
mini whisk
kitchen towel


"PAMPER ME"
lotion
fuzzy socks
set of nail polish
manicure stickers
orange & almond chocolate bar
bath salts
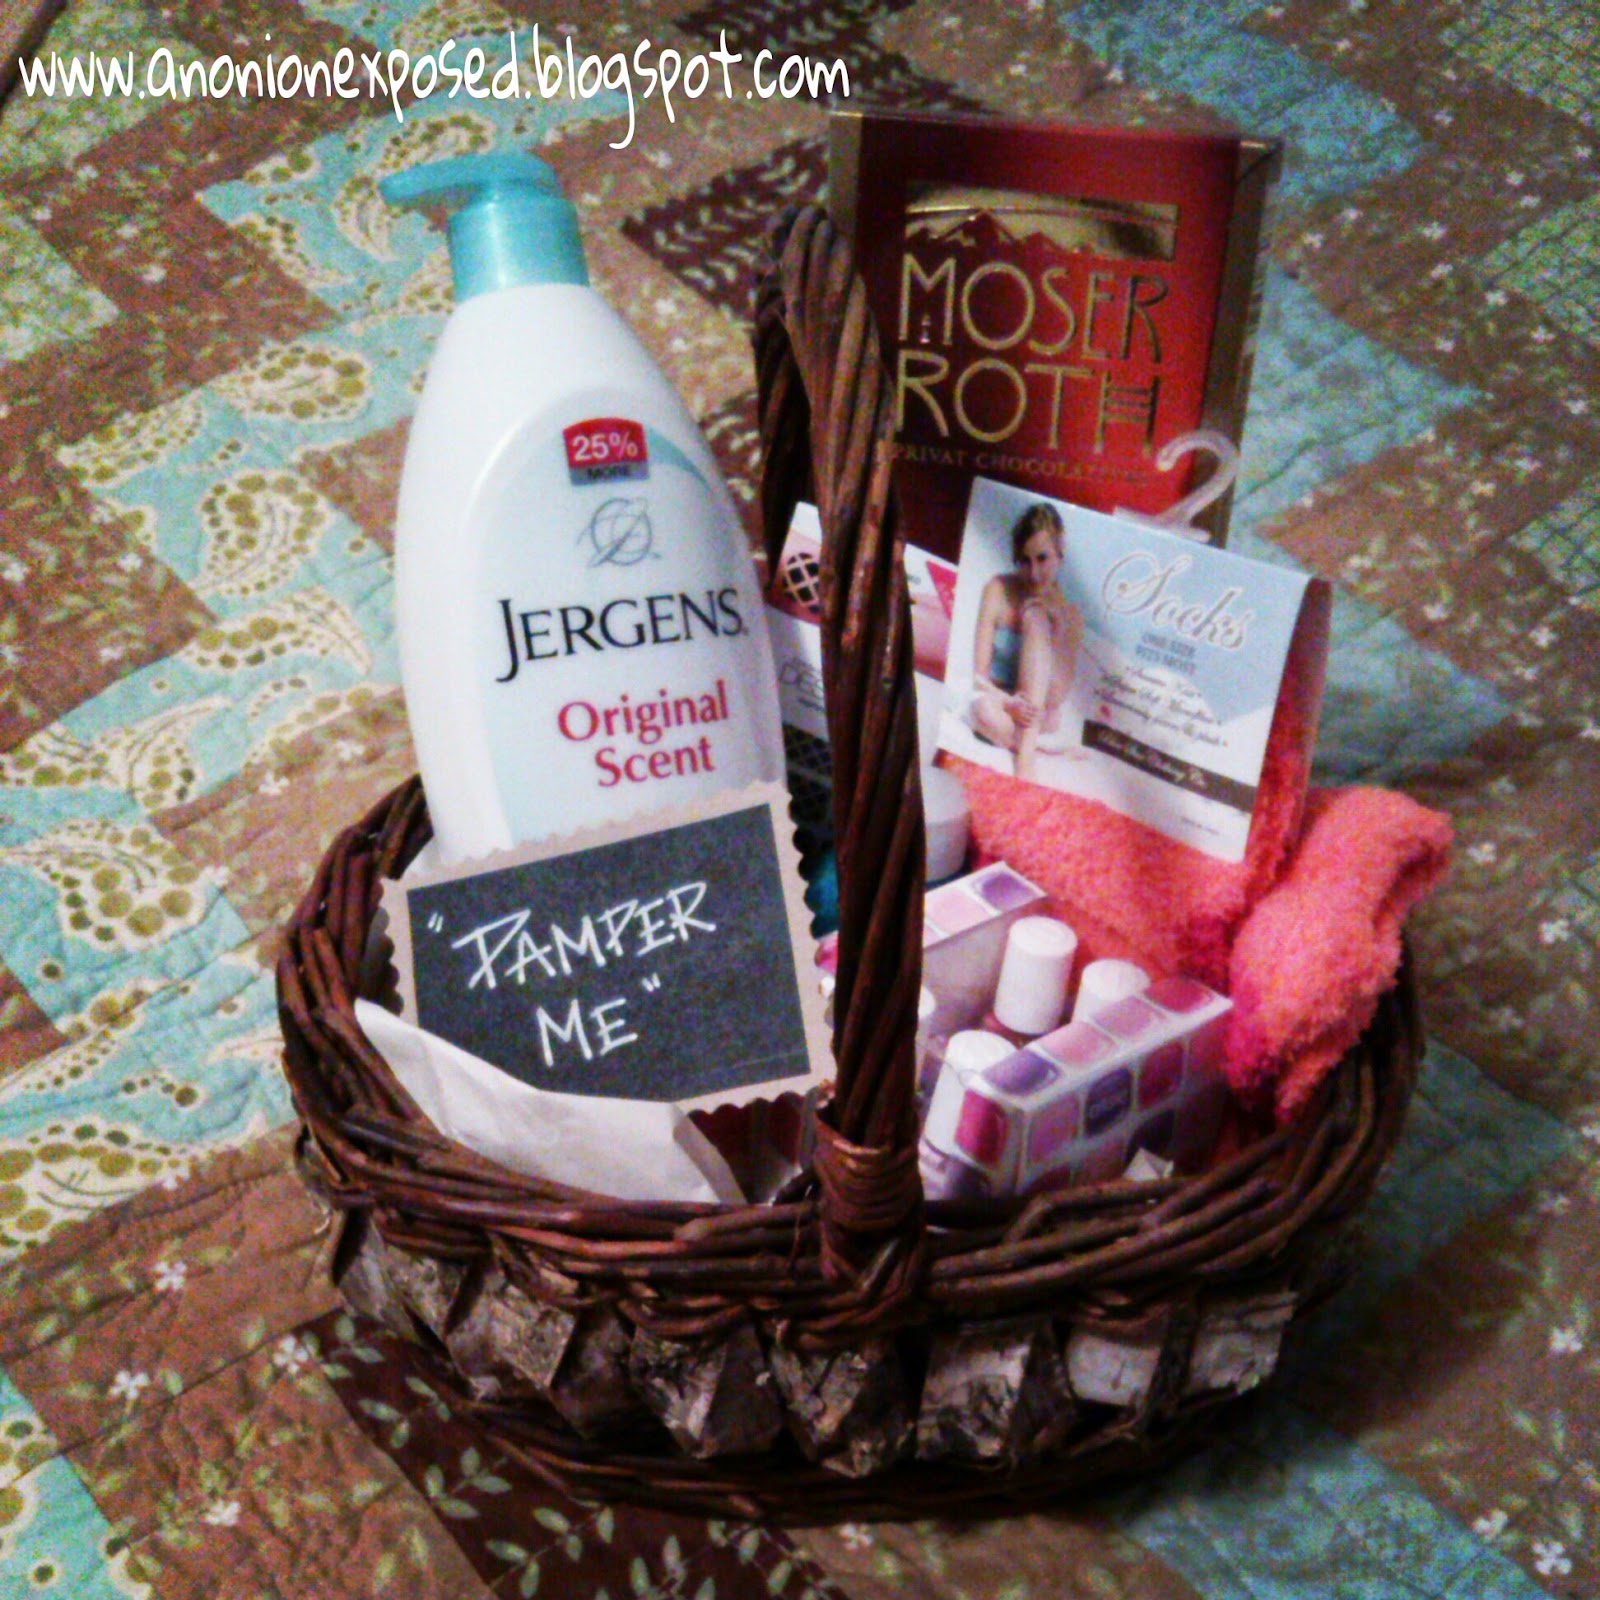


*We also had "COFFEE & CHOCOLATE", "MANICURE ME", and "BAKER'S DREAM" baskets that we didn't get pictures of. :(


Having the prize baskets was a great way to do it! We didn't have to worry about running out of prizes, and we were able to get prizes that were more unique and fun. I would highly recommend it!

Yes, planning a bridal shower is a lot of work, but overall, it is SO much fun! Definitely a good experience for me! :)


Friday, September 5, 2014

Vegan Peanut Butter Cookie


Mike has been craving a peanut butter cookie (or several)!  I have just not been in any mood to bake lately, which as you know, is one of my favorite hobbies.  For some reason, it just sounded like a lot of work.  I am really glad that I forced myself to make my man a treat.  Not only did I enjoy putting on my hypothetical apron (couldn't find my cute one), but my Mikey enjoyed the treat. :)  

This is such an easy recipe.  If you are looking for a quick cookie, it's a great one to try. 

 All you need is:

2/3 cup ground oatmeal
1 tsp. baking soda
1/8 tsp. salt
1 cup peanut butter
1 cup brown sugar
2 tsp. vanilla
1/8 cup water

Preheat oven to 350 degrees.

In a large bowl, blend peanut butter and brown sugar. Add vanilla. Blend again.  

Stir ground oatmeal, baking soda, and salt together.

In the large bowl, slowly add oatmeal mixture to peanut butter mixture.  Stir with large spoon until almost combined.  Use blender for just few moments to make sure it's all blended. Add water.  Blend again. 

Roll into balls, and gently press a crisscross imprint with a fork.

Bake 13-17 minutes.  After taking out of oven, leave on pan for a couple minutes.  Transfer to cooling rack.  


(Directions with Photos)


 First, blend oatmeal in a food processor or blender until "flour like" consistency. 


I ran my blender for about a minute. 


Put peanut butter and brown sugar in a large bowl.  Blend until evenly distributed. 


Add vanilla. 


Blend again until mixed well. 


On the side, mix salt, baking soda, and oatmeal flour. 


Add 1/3 cup of flour at a time. 


Mix well with a spoon.  After almost mixed, use blender for just a moment. 


Form cookie balls. 


Make sure to do the iconic crisscross in the middle, using a fork. 


Bake 13-17 minutes at 350 degrees. Allow to sit on the pan for a couple extra minutes after taking it out of the oven. They are a little crumby, but that makes them great to eat warm with a glass of milk.  


Wednesday, September 3, 2014

Cabbage Skillet

If you are looking for a fancy meal to serve at your next dinner party, this may not be it.  But if you are looking for a meal that pleases even the picky eaters.... this may be your lucky day!
My kids and I have been staying with my wonderful family while we wait until the closing on our new home.  That means there are 14 mouths to feed at times! 15 or more when my hubby is able to come for the weekend or neighboring siblings drop by! That's a lot of people to please! Amazingly, each time I have made this I never get a "ugh" or "that again?".  Instead I get "yes!" and "yum"!
No complaints there! :)

So here is what you will need:

1 pound seasoned pork sausage
1 medium head cabbage
3 carrots
1 green pepper
1 large onion
4 potatoes
1-2 T. Worcestershire sauce
1/2 cup water
salt and pepper


First, brown the sausage in a large skillet. 
I love to use my Mom's Dutch oven! But, if you don't have one, a skillet will work. 
Next, you will need to cut the potatoes lengthwise and then thinly slice them.  
(They should appear as half moons.)
Now, dice the onion.
Grate the carrots. I use a cheese box grater...works great!
Chop the green pepper.
 

Add all the chopped, sliced, and grated "goodies" to the pot.
Salt and pepper generously and add worcestershire sauce.
Add the water.
Turn the heat to med-high and cover.


Shred cabbage and add to the pot.
After a few minutes, turn the heat to medium. 
Continue to simmer until all veggies are thoroughly cooked. (No one likes crunchy potatoes.) ;)
You will need to stir the mixture occasionally.


When it is all done it will look
 something like this. :)


It is great as it is or serve with ketchup or sweet and sour sauce.
It's almost like an egg roll with no wrapper and no oil! :)


Monday, August 25, 2014

Oven Baked Brown Rice


I never thought there was a special trick to making brown rice versus white rice.
I was wrong.

The first time I ever made brown rice, I made it just like white rice, and I swear my husband and I almost chipped a tooth. (Okay, maybe that's an exaggeration, but it WAS pretty bad.)

In this post, I will show you a trick I found for making perfect brown rice. Every time. In the oven!

It still has the texture and nuttiness of brown rice, but it's also soft and fluffy and not mushy at all.

I usually make this batch (it's a pretty big batch for just the two of us!), we use what we need, then freeze the rest in a big ziploc. It's so handy to have cooked rice ready to go and it holds up perfectly in the freezer.

********************************************************************

How to make perfect brown rice:

First of all, pour about 7 cups of water in a dutch oven.
(You could also use a different baking dish, just be sure it's big enough and can seal up well. Maybe a 9x13 with aluminum foil tucked tightly.)


Add 3 cups brown rice.


Add 1 tablespoon of olive oil and your desired seasonings. 
(I did salt, pepper, and some cumin for this batch.)


Stir it up well.


Cover and place in a cold oven.


Turn the oven on to 450 degrees.
Turn your timer on for 1 hour.


Do NOT check it during that hour or you will release too much steam.

*********************************************************************

That's it!
When the hour is up, remove the rice from the oven and uncover. 


Fluff with a fork.


Serve and freeze any leftovers, if you'd like. :)


Friday, August 22, 2014

Cauliflower "Alfredo"


I have mentioned in past posts that I am very excited for my little sister's wedding.  I can't believe my little sister is getting married!!  I feel so old. :/

Despite all the excitement, some inevitable events go along with weddings that are no so enjoyable (at least for us women out there who aren't a size 2).  I am talking about dress fittings.  I know I'm just a bridesmaid but, come on ladies, we all want to feel "prettified" if we are in a wedding!  The dreaded dress fitting.  Eeeeek.... I cringe just thinking about it.  

Even though I understand that all eyes will be on the bride, and maybe on the groom a little bit ;), I still don't particularly want to feel like a bloated mess.  So in preparation for the wedding...and the dress fitting...I have been, once again, trying to watch it.  Mikey and I have been doing rather well. Healthy meals, packing lunches so we don't eat out, 'good for you' snack options, etc.  The only problem... we have both been craving more MEAL type foods versus a variety of healthy snacks.

I was scanning Pinterest and I came across this recipe.  It peaked my interest.  "Alfredo" sauce with no cheese. You do have to go in it with an open mind.  It's not so much an alfredo pasta, just a yummy pasta dish.  I feel like it has many possibilities, especially since cauliflower can take on different seasonings so well.   
So, in trying to stick to our healthy eating and hoping to fit a little better into my bridesmaids dress, this was a great choice.  Give it a try and let me know what you think!

************************************************************************

Cauliflower "Alfredo"

1 head of cauliflower, chopped
4 cups vegetable broth
1/2 purple onion
1/2 green pepper
1 T. minced garlic
salt, to taste
pepper, to taste
Fettuccine noodles (4 servings)
Cherry tomatoes, sauteed, optional


1.  Chop a head of cauliflower.


2.  In a large saucepan, place cauliflower and 3 cups of vegetable broth. Bring to a boil. 


3. Chop veggies.


4.  Boil for approximately 15 minutes or until cauliflower is tender. 


5. Right after putting the cauliflower on, start your water for the fettuccine.


6.  Prepare noodles per instructions on the box. 


7. Heat the butter and olive oil. 


8.  Saute onion and pepper until tender. 


9.  When peppers and onion are done, add minced garlic. Saute another minute. 


10. Once cauliflower is tender, using a slotted spoon, place cauliflower in a food processor (or blender-that's all I have). Add 1 cup of the remaining vegetable broth.  Top with cooked veggies.  Add more seasonings if you prefer.  Blend until smooth.  Add a little bit of the extra broth if it needs to be thinned out. 
(I apologize...I somehow lost the picture in the blender.)

Strain your noodles.
Add your sauce.
Top with sauteed tomatoes.

Fast, filling, and mmm mmm good. 


The color is not the most appetizing, but I definitely enjoyed this!


Monday, August 11, 2014

Roasted Chickpeas


While visiting my sister in Tennessee this summer, we were talking about healthy snacks we could make. (Mostly so I wouldn't return home with five pounds more than I went down there with. That always seems to happen...) I had recently heard of roasting chickpeas for a crunchy snack, so we decided to give it a go. Not only are they good for you, but there are so many potential flavor combinations you could try!  We all really like buffalo flavors, so we decided to try this mixture first. Big hit! :)

Best part? It only takes a few ingredients!

1 (15 oz.) can of garbanzo beans, rinsed and drained
buffalo hot sauce
garlic paste 
ranch seasoning (optional)

THAT'S IT!

This recipe is so easy, you don't even have to measure.  Throw a little of this, sprinkle a little of that and then wait.  
Let us know if you think of some yummy flavor combinations to try!

*****************************************************************

First off, you're going to want to rinse and drain your garbanzo beans. 


Transfer the beans to a mixing bowl.


Douse the beans in hot sauce and squeeze a little garlic in there.

(We used a combination of Louisiana Hot Sauce and Frank's buffalo sauce because that is what we had on hand, but your favorite hot sauce would work, too! You can also use fresh pressed garlic if you don't have the paste.)


Gently stir to mix.

Add a little more hot sauce if you feel like it needs more!


Sprinkle on the ranch seasoning.


Gently stir again.

Cover with plastic wrap and let it marinate for 1 hour, stirring occasionally.


After it's done "marinating", drain the beans off.
(If there is too much excess liquid, they get mushy rather than crunchy.)


Transfer to a baking sheet that is lined with parchment paper.


Don't they look yummy already?!


Spread them out evenly.


Bake at 300 degrees for about an hour, or until they reach the degree of crunchiness that you like.  


Check them periodically and stir them up.


We made a few batches and tried it at different temperatures for different amounts of time.
The "crunch level" definitely depends on how long you leave them in there. 

To test them, pull a couple out and let them cool for a minute before eating. You'll get an idea on how crunchy they are.

If you leave them in long enough, they almost get like "corn nut" crunchy, but you also have to be careful not to burn them to get them to that point. :)


Have fun with it! They taste good either way! :)


Check these out!