Search This Blog

Thursday, May 30, 2013

Roasted Cabbage Slices

Have you ever made something for dinner knowing full well that it probably wasn't going to taste that great, but since it was good for you, you'd make it anyway? As bad as that sounds, that's how dinner started last night. After my hubby and I got back from the gym, we set to work making some grilled chicken and roasted cabbage for dinner.

We figured the cabbage would be edible, but we never expected to enjoy it as much as we did! In fact, I made 4 cabbage slices for dinner (thinking we could have some leftover for lunches today) and it was all gone! I dished his plate, and as we were eating, he laughed, said "this is actually really good!", and got up to get a third slice. We will definitely be coming back to this one soon. :)


We started with wedges that were about 1/2 inch thick. 
Lay them out on a baking sheet that's lightly coated in olive oil.


Try to cut the wedges to the same width so they cook evenly.


Lightly spray tops with olive oil. (If you don't have an oil spritzer, you can also just brush it on lightly.)
Generously sprinkle with freshly cracked black pepper & sea salt.
(You can add garlic and other spices, too, if you'd like!)


Bake in a 400 degree oven for about 15-20 minutes or until bottoms are starting to turn golden brown.
Carefully flip over so the golden side is on top.


Top again with some more salt & pepper.


{At this point, I also sprinkled on a little fresh Parmesan cheese, but it really didn't need it.}


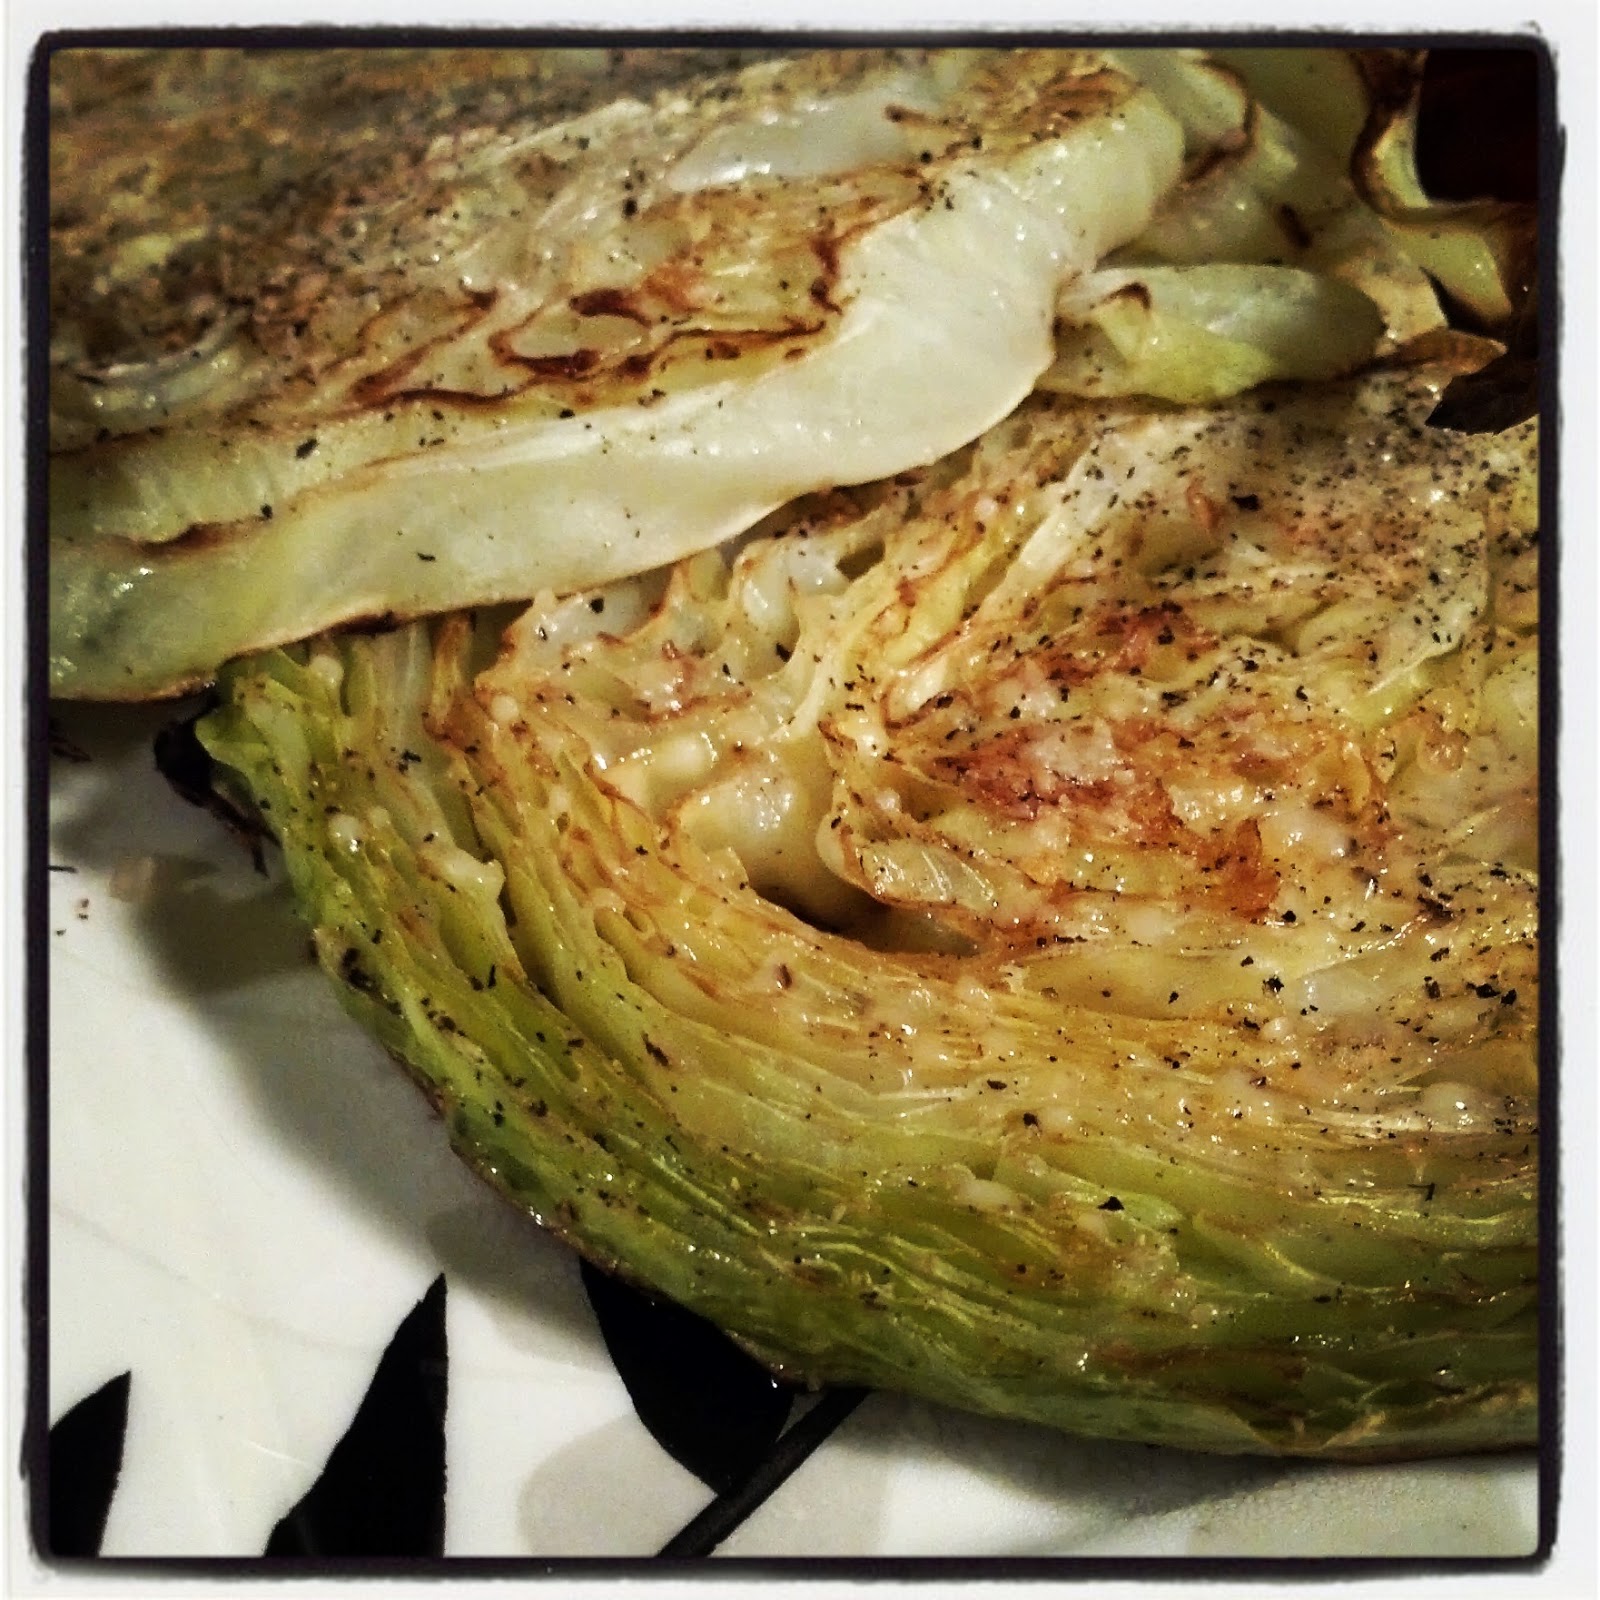
 Roast another 15-20 minutes until bottom is golden brown and cabbage is soft.
Serve hot.

(We were thinking they would be really good topped with a light sprinkling of fresh lemon juice, too!)


It's surprising how such a simple recipe can bring so much flavor to your meal. :)


Ingredients

cabbage
pepper (freshly cracked, if possible)
sea salt
additional seasonings, optional
Parmesan cheese, optional

Directions

Preheat oven to 400 degrees.
Slice cabbage in 1/2 inch slices.
Lightly spray baking sheet with olive oil.
Lay cabbage slices on baking sheet.
Lightly brush, or spray, slices with olive oil.
Top with seasonings.
Bake 15-20 minutes until bottoms begin to turn golden brown.
Flip over and top with more seasonings and cheese (optional).
Bake another 15-20 minutes until bottom begins to brown and cabbage is soft.
Serve hot.


Wednesday, May 29, 2013

Naked Inspired "Green Machine" Smoothie

I'm starting to think that this whole healthy eating thing might actually be enjoyable. You're probably thinking "of course it is, you goof!", and I see where you're coming from. Don't get me wrong. Most of the time, I do like eating healthy and it makes me feel good, but then I see a chocolate chip cookie or french fries and all my healthy habits go flying out the window.

I have found that, for me to continue eating right, I also need to find ways to cure my cravings. I'm not one of those lucky people that can live without sweets. I love them! And I crave them often. But, unfortunately, I also crave salty, fried, sour & tangy foods. There is no pleasing me. :)

Now that I've been able to find some recipes for meals and snacks that are sweet or salty, yet still healthy, it helps me stay on track while curing those pesky cravings. (Check out my Easy & Healthy Ice Cream!)

For breakfast this morning, I made my hubby and I green smoothies for breakfast. It was the first time we've had homemade green smoothies and they were delicious! They reminded me a lot of the Naked Green Machine Smoothies (hence my title).


I put mine in a to-go cup for our drive to work, and he downed his while he got ready for the day. They were quick, easy, and a great way to have a healthy, filling breakfast. I think I'm going to try to fill freezer bags with all the ingredients (minus the liquid) and keep them in the freezer. That way we can just pull out a bag, dump it in the blender with the liquid, and we would be good to go!


Ingredients

2 large handfuls fresh spinach
1 large banana
1 c. pineapple
1 c. yogurt
1 c. filtered water

Directions

Toss everything in the blender & blend!

*Makes 2 smoothies. 
Drink both now, or cover one and put it in the fridge for later.


(Directions with Photos)

2 handfuls fresh spinach 


1 large banana


1 cup pineapple
(I had some fresh pineapple in the freezer which worked perfectly!)


1 cup yogurt
(If you're looking for some homemade yogurt, click here! It's really yummy and way cheaper!)


1 cup filtered water


Cover and turn on your blender.


I turned mine to the "liquify" setting which worked really well. 
Blend until all the little spinach pieces are gone.


Look at all that green, frothy goodness!


Now drink it up!


On the way to work, we were discussing all the possibilities with this smoothie. 
Here are some ideas we came up with:

Replace the spinach with:
kale

Add:
parsley
apples
blueberries
blackberries
strawberries
raspberries
mango
kiwi
carrots
broccoli

Replace the water with:
fruit juice
coconut water

So many options! :)


Tuesday, May 28, 2013

Chicken Avocado Summer Wrap

After eating dinner tonight, my husband and I were discussing what to call this wrap. He came up with "summery" then said "that's all I've got". At least I got one idea out of him. :)

No matter what you decide to call it, it doesn't change the deliciousness of it! We were going for something summery, filling, healthy, and yummy, all in one wrap. I think we got it.


Ingredients

grilled chicken
avocado
tomatoes
red onion
fresh spinach
couscous (or quinoa)
wrap or tortilla

We would advise you to serve your wrap with some sort of condiment, so it's not too dry. 
Some suggestions would be fresh lime juice, mustard, vinaigrette, ranch dressing, etc.


We came up with this wrap as a way to use up this leftover chicken in the fridge.
It was seasoned with lots of garlic, pepper and Cajun, as well as some other spices. 
We like our chicken fairly spicy, but season yours to your liking.


Slice it up into strips. You can have it cold, but we wanted it warm. I threw it in a hot saute pan and poured about a tablespoon of water onto the chicken, covered it quickly and left it on medium heat. 
It reheated the chicken perfectly while keeping it moist as the same time.


While the chicken was reheating, I made some couscous.
(If you've never made it before, just bring your water to a boil. Stir in the couscous. Cover and remove from heat. Let sit 5 minutes, then fluff with a fork. {I used 1/2 c. water and 1/3 c. couscous.} You can add fresh or dried herbs and seasonings, as well.)


Wash your fresh spinach.


Chop up your fresh veggies.
We used avocado, tomato, and red onion.


Select your wrap.
We saw these at the grocery store and decided to give them a try. 
They were pretty good, but I think a spinach or sun-dried tomato tortilla would be even better!


 Spread a bed of couscous on the center of your wrap.
Throw all your veggies and chicken on top of the couscous.


Roll it up.


Enjoy!
Tony enjoyed a little Jack Daniel's mustard on his, whereas I liked mine with fresh squeezed lime juice. Experiment and find your favorite!


Saturday, May 25, 2013

Easy & Delicious Fruit Dip

 It's the weekend! Since it's not just any weekend, you've probably made some plans to celebrate. If you're going to a party and need a dish to share, look no further. I made a fruit tray to share with my in laws this weekend and it went over really well. It's quick, easy, and most importantly...delicious!!

Honestly, I think the dip was even better the next day! :) 


Ingredients

1 container  (8 oz) cool whip
6 oz Yoplait strawberry yogurt
2 Tbsp frozen raspberries, thawed

Directions

Thaw and mash raspberries.
Mix well with yogurt and cool whip.
Serve with fresh fruit.
(Can make the day before serving and refrigerate overnight.)


(Directions with Photos)

Thaw and mash raspberries.


Mix well with yogurt and cool whip.


Can make the day before serving and refrigerate overnight, or serve immediately.


Serve with fresh fruit.
(If you're serving apples, be sure to soak them in water splashed with lemon juice or salt first, so they don't turn brown.)

Enjoy!


Friday, May 24, 2013

Energy Bites (No-Bake)

The weather has been warm, but not quite long enough to get people to jump in the lakes quite yet. I'm pretty sure the outdoor pool at my apartment complex opens this weekend. It just seems to be an ugly reminder that I did not lose as much weight as I would have liked before swimming season. BUT....on a positive note, this week has been quite successful. My husband has gotten into the "I want to lose 30 pounds" mode and it helps me tremendously when he is making healthier choices as well.

We've both been working out and eating healthier. Cutting out unhealthy fats and most carbs. Drinking hot tea instead of coffee loaded with french vanilla creamer. Making homemade vinaigrettes instead of topping our fresh salads with ranch & western dressings. Snacking on celery/carrot sticks and hard boiled eggs instead of a bag of our favorite chips. Blending up frozen fruit and a little yogurt for a smoothie when we're really craving ice cream. I think you get the point. 


Anyway, now that my leg muscles can barely accomplish their task before giving way and crumbling beneath me, I'm actually excited to see a difference! 

I found this recipe via the Gimme Some Oven blog and decided to give it a try. I modified it to what I had on hand, and boy, will I be making these again! They are so yummy and just the right amount of nourishment to get you through a great workout. 

Recipe adapted from Gimme Some Oven


Ingredients

1/3 c. honey
1/2 c. creamy peanut butter
1 tsp. vanilla
1 c. old fashioned rolled oats
1/4 c. flaxseed, ground
1/4 c. wheat bran
2/3 c. coconut flakes, toasted and cooled
1-2 Tbsp. chopped almonds, toasted and cooled
1/4 c. dried fruit (I used raisins and dried cranberries)
1/3 c. chocolate chips


Directions

First, chop your almonds and spread on half of a cookie sheet. Spread coconut on other half.
Toast in oven until edges are golden brown. Remove from oven and cool completely.

Combine honey, peanut butter, and vanilla in medium bowl and mix well.
In separate bowl, combine oats, flaxseed, wheat bran, toasted coconut, and toasted almonds.
Stir in dried fruit and chocolate chips.
Gently stir dry ingredients into creamy mixture and mix thoroughly.
Cover and refrigerate for 30 minutes.
Remove from fridge and form into balls.
Store in an airtight container in the refrigerator for up to 1 week.


 (Directions with Photos)

First, chop your almonds and spread on half of a cookie sheet. Spread coconut on other half.
Toast in oven until edges are golden brown. Remove from oven and cool completely.

Combine honey, peanut butter, and vanilla in medium bowl and mix well.


In separate bowl, combine oats, flaxseed, wheat bran, toasted coconut, and toasted almonds.
Stir in dried fruit and chocolate chips.


Gently stir dry ingredients into creamy mixture and mix thoroughly.


Cover and refrigerate for 30 minutes.


Remove from fridge and form into balls.
(I used the medium Pampered Chef scoop (approx. 2 Tbsp), but next time I think I'll use mini dark chocolate chips and use the small scoop (1 Tbsp) instead.)


Store in an airtight container in the refrigerator for up to 1 week.
(I got 21 golf ball-sized balls out of this batch.)


These energy bites remind me of a combination between a chewy granola bar and an oatmeal cookie dough ball. 
Healthy AND satisfying!


Saturday, May 18, 2013

Homemade Travel Games

 While my sisters were visiting yesterday, we were able to find some good deals at a few garage sales. One of our best thrifty finds were these older, hard plastic, VHS cases. They were in very good shape and, best of all, free!


You may be thinking "did she really just pick them up because they were free and she automatically thought it was a steal?" Have no fear...I had a plan. :)

Lucy and I got up early and pulled out a bunch of crafting supplies I had on hand. We decided on which games would be best and we began our task of making homemade travel games! :)
We started by getting rid of these nasty bumps inside the case.


Using a serrated knife, we filed them off before hot gluing some felt down.


BACKGAMMON

We cut strips of sticky-backed velcro into points and set them in place.


We put velcro on the bottom of some buttons (we made one extra piece for each color), added a velcro strip down the middle for "the bar", and threw in a couple dice to finish it off.


TIC-TAC-TOE

Here we hot glued strips of red felt down along with some velcro squares.
Stick velcro underneath the buttons as well. (We made five of each color.)


We put strips of velcro on the lid of the case to hold the pieces while not in play.


FRIENDSHIP BRACELET KITS

I posted earlier about the woven friendship bracelets that we'll be taking on our road trip soon.
(Click here if you haven't seen that post yet.)
We used the 3rd case to hold everything we need for these little bracelets.

*cardboard looms
*scissors
*tape
*embroidery floss


 Using scrapbook paper and sticker labels, we marked each one so we are sure to grab the case we intended to in our soon-to-be cluttered cars. :)


Check these out!