My cousin delivered a baby girl recently and had her baby shower yesterday. I wasn't able to make it to the shower, but I was able to get her gift made a couple weeks ago. I was looking at fold-over diaper clutches on Pinterest and liked the idea, but I knew I wanted something with a zipper. That way, if she needed to throw in some tubes of cream or a pacifier, they wouldn't be falling out of the slot pockets. I decided I wanted to make a small bag, easier to lug around than a full-sized diaper bag, but still enough room to carry some wipes, a diaper or two, and an extra outfit, just in case. :)
I realize that sometimes you really need the big diaper bag, but there are so many times that all I see moms take out of the bag is a diaper and wipes. I thought it would be nice to have a smaller option if she's just making a quick trip to the store or even for going to church. Sure, maybe the large bag will be sitting in the car, but at least she'll have the option to take a smaller bag.
I also thought, even if she doesn't use it for diapers, maybe it would be nice to carry around toys or snacks for her little one once she gets older. Or even make-up if she wanted to use it for herself. You never know. :)
What you'll need:
2 pieces of material for the bag (same size as lining)
2 pieces of material for the lining (same size as bag)
material for bow, optional
material for tube around the bow, optional
strip for the wrist strap
strip for the loop
zipper
key ring for strap
(I really just wing it when sewing. I know I should start measuring, but that seems like so much work to me. So decide on how large you would like your bag, strap, etc. and I will help you put it together with these directions.)
I wanted to make it kind of "girly" since she had a little girl and decided to add a bow on the front of the bag. If you don't want the bow, just skip the first step.
I took some scrap material and measured the width that I wanted the bag to be. I made a small tube to go around the material.
(The two narrow strips are for the strap and loop. I'll get to those later, but you can prepare them now, if you know how long you want them.)
When sliding the tube around the material, it will look like a bow.
Take a piece of the material for the bag and the lining, face them, wrong sides together, and pin your zipper in place. It should be pinned on the outer side of the bag. Look at the picture to see where your zipper should be placed. (The print fabric is my outer bag and the purple is the lining.)
Sew it in place.
Fold it down so that only the teeth show on the outer side and stitch in place. I did two rows of stitching because I like the look of two more than one, but you can do one, if you prefer.
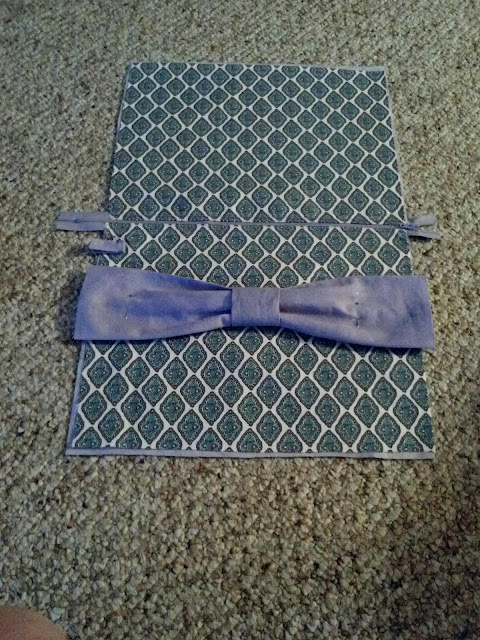
Repeat with other 2 pieces on the other half of the zipper. When the zipper is closed, you should be able to spread the material out like this.
Place the bow where you would like it and pin in place.
Also, fold the small strip for the loop that we were talking about earlier in half and pin in place. (If you can't see it, I placed mine above the bow on the left side, just below the zipper.)
Fold the top piece over the bow and make sure the zipper is even at the top and pin in place.
Using scrap fabric, place the outer edge flush against the sides and fold down the tops.
Sew along the edges.
Fold the edge of the zipper down.
Fold the scrap fabric over the zipper and rough edges and pin in place.
Sew along the edge.
Repeat on the other side.
Then finish off by repeating the same step to the very bottom of the bag.
If you'd like the bag to have a flat bottom, pinch the bottom of the bag (still inside out) and sew the two corners.
Cut off the point and zigzag stitch over the rough edge.
Turn the bag inside out.
Put the key ring on the strap and attach it to the loop.
You're all done!
Hope it wasn't too confusing. :)


This will be great for board books and treats for car rides when she gets a little older! :)
ReplyDelete